Remote Python with PyCharm/IntelliJ
Introduction
Often I create a VM specifically for one project. This way I don’t have to worry about messing up common dependencies between projects, such as libraries and services like a database and webserver.
What I don’t like to do is to set up my personal development preferences on each VM, plus the VM is slower than the host, so I want to run PyCharm or IntelliJ on my host machine, even when the host is running another OS than what we’re developing for. Note that the free variant of PyCharm does not support this.
Here I will describe the typical tasks I perform to get a new project up and running.
Install VM and basic setup
First we create a new VM with VirtualBox and install a ubuntu 14.04. First thing
after logging on the new system is installing vim and virtualenvwrapper, press
ctrl-alt-t for a terminal and a sudo apt-get install vim virtualenvwrapper
openssh-server. Need vim just because and virtualenvwrapper because we
want to work on python stuff. We want to be able to SSH to the machine as well.
Next I fix default locales, because I choose Netherlands as location during
ubuntu install. I found out the hard way that PostgreSQL ubuntu debs fail on a
postinst step where it tries to create a new cluster. But the installation
itself does not fail! Automated deployment systems happily continue with the
missing cluster and fail at a later stage when the database is assumed to be up
and running.
So fixing the locales: echo 'LANG="en_US.UTF-8"' > /etc/default/locales
Lastly I paste my public ssh key into ~/.ssh/authorized_keys.
Creating the virtualenv
From this point we can operate the VM using SSH only, and we can log out of the
GUI and work from our fast host. Currently, I am working on Windows, and I am
using PuTTY for SSH. I used PuTTYgen to create an SSH key pair and Pageant as the
SSH agent that holds my keys.
daniel@remotepy:~$ mkvirtualenv remotepyenv
New python executable in remotepyenv/bin/python
Installing setuptools, pip...done.
(remotepyenv)daniel@remotepy:~$
Because we used ubuntu’s virtualenvwrapper we have a virtualenv that has a
too old pip. We want the newest one mostly because of Python Wheels support.
Let’s update it to latest:
(remotepyenv)daniel@remotepy:~$ pip install --upgrade pip
Downloading/unpacking pip from https://pypi.python.org/packages/py2.py3/p/pip/pip-6.1.1-py2.py3-none-any.whl#md5=172eb5abab25a5e0f7a7b63c7a49378d
  Downloading pip-6.1.1-py2.py3-none-any.whl (1.1MB): 1.1MB downloaded
Installing collected packages: pip
  Found existing installation: pip 1.5.4
    Uninstalling pip:
      Successfully uninstalled pip
Successfully installed pip
Cleaning up...
Have the IDE on your host use the remotepyenv
Because Jetbrains products are just so cool we can configure IntelliJ to use a remote python interpreter, including all debugging and virtualenv tools like installing packages. The following is based on IntelliJ, licensed PyCharm can do this too, but the screenshots do not match.
Create a new project and when selecting your SDK choose Add remote.

Next we get a nice dialog to set up SSH credentials and the python executable
path. For the python path I do a which python on the still open putty session,
so I can copy and paste the path. Like a good programmer I am lazy and let the
computer do work for me, also less likely to give a wrong path.
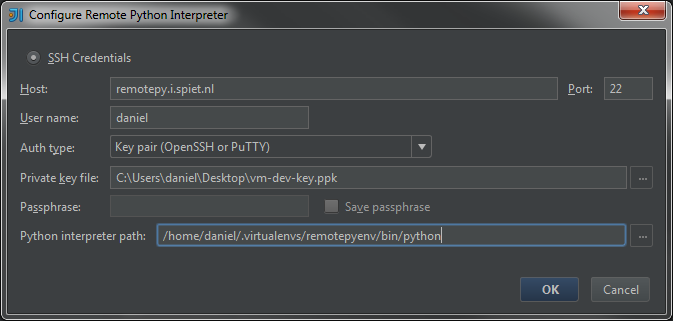
Note I chose to use the Key Pair option at auth type. I won’t think less of you if you choose to use passwords, I really don’t! :)

Next, it’ll say something like ‘updating skeletons’, let it do its thing. This can take some time on remote envs that have a lot of packages installed.
When it’s done:

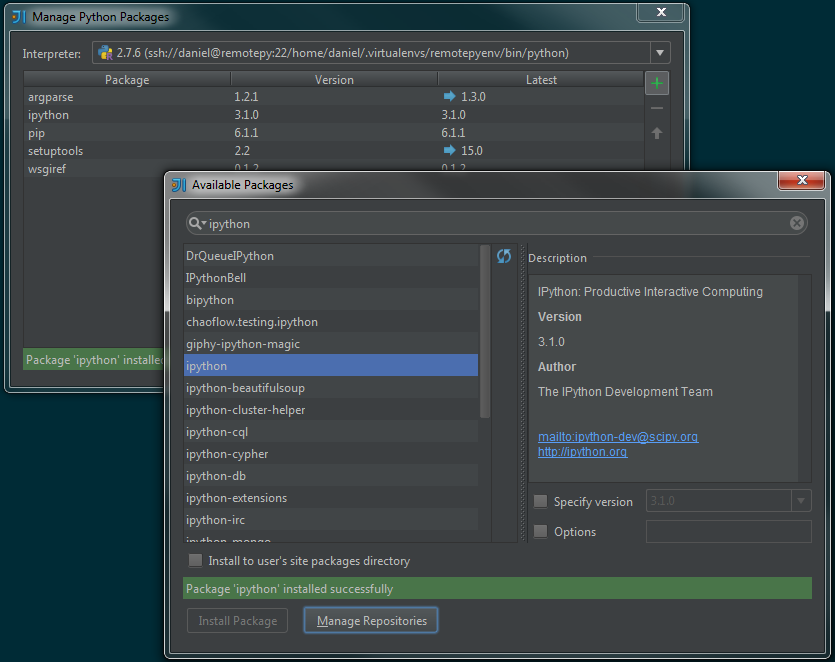
Remote package management:
Share code files on remote and local host
The tricky part is to have both IntelliJ and the remote python interpreter use the same code files. We can either share them on Windows and mount it in the VM or do it the other way around. Let’s share it in Windows and mount it on the VM. In Windows share the project folder. And mount it on the VM:
# will mount it under /run/user/1000/gvfs/smb-share\:server\=windowsbox\,share\=remotepyproject\,user\=daniel/
daniel@remotepy:~$ gvfs-mount smb://daniel@windowsbox/remotepyproject
Now in the “Run/Debug configurations” you set the script path and the working
directory as they are on the remote host:
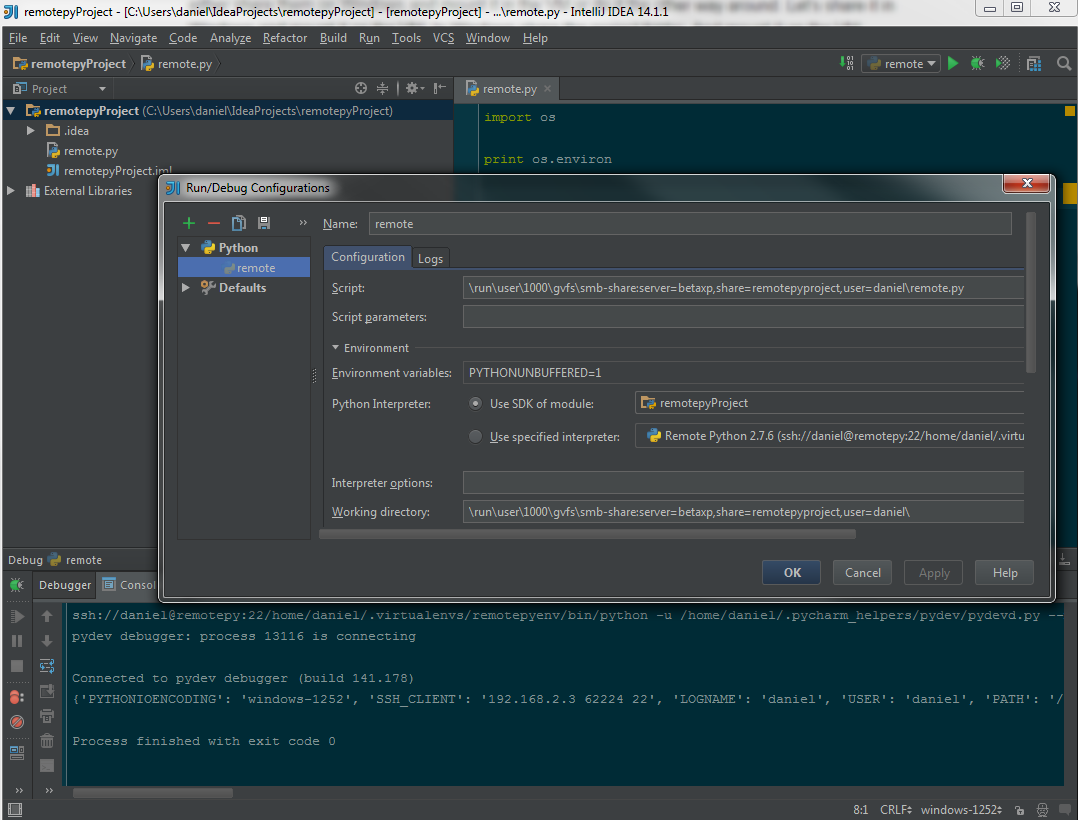
Also edit the path mappings, these will be used during debugging so IntelliJ
knows where to find files locally.

Remote Debugging
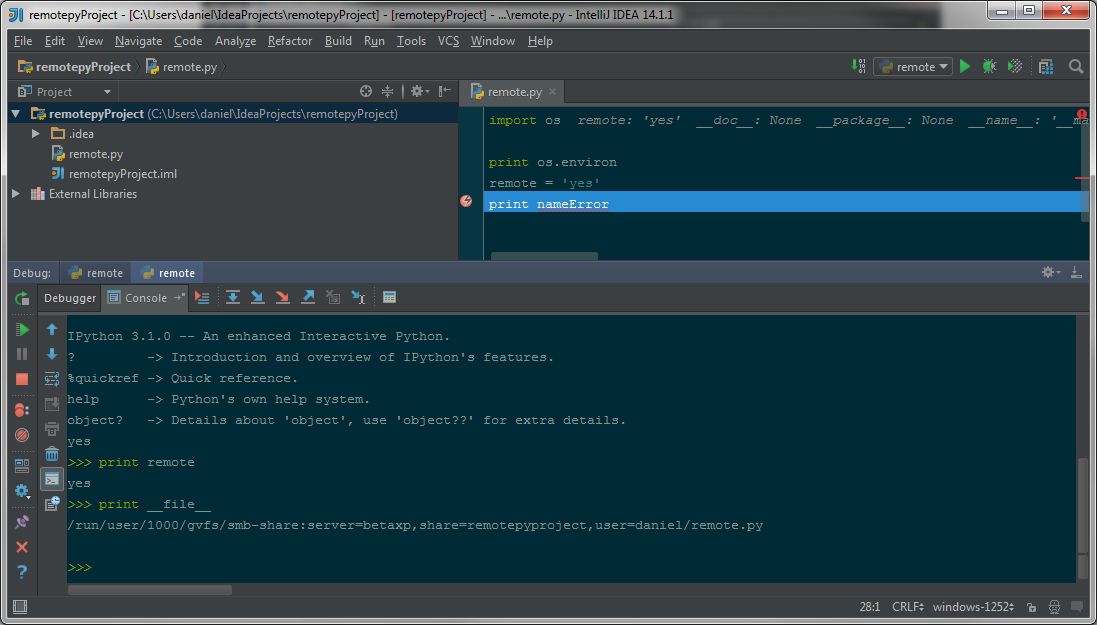
To do remote debugging, just launch the debug process as you normally would
with a local interpreter, note the break on NameError and the Variables below.
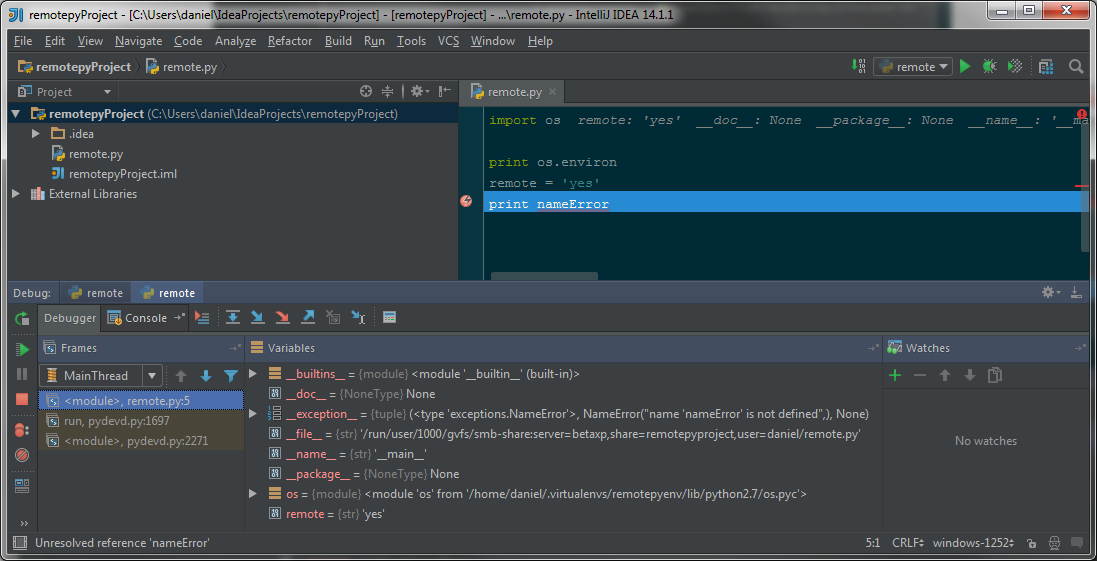
We can of course also get the IPython prompt on the remote debugged process.
Conclusion
I don’t like the fact that I need to share the code files between the remote host and the local host manually. But besides that I very much like this way of working. It also works well if you are actually working on a remote machine to which you don’t have a graphical terminal to run the IDE on.